Set up continuous deployments
Introduction
After setting up the CI process, the next step is to configure automated (or continuous) deployments for your environments. In some setups, continuous deployments is not desired. In the end, it all drills down to how often you want to deliver release for your project. If the release cycle and cadence of your project is more agile and you want to deliver more releases in a short period of time, then it makes sense to have such an automated setup.
In practice, this is not the only reason. You will want some environments such as the development environment to continuously reflect latest code changes of your main application repository branch. Here is where continuous deployments play an important role. Another important aspect is - how do you track each change and what is deployed where?
To answer all above questions, a new concept is introduced called GitOps. GitOps is yet another set of methodologies and accompanying practices, allowing automated deployments and easy track of changes for all your application deployments to various environments. It relies on Git as the single source of truth. It means, you rely on the Git history feature to track all changes, and revert the system to a previous working state in case something goes bad.
One popular solution used to implement GitOps principles is Argo CD, a free and open source project very well supported by the community. Argo CD is a declarative, GitOps continuous delivery tool for Kubernetes.
Where does Argo CD fit in?
Argo CD sits at the very end of your CI process. It waits for changes to happen in your Git repository over it is watching. No need to create and maintain separate GitHub workflows for deploying application components to each environment. Just tell Argo about your GitHub repository, and what Kubernetes cluster to sync with. Then, let Argo CD do the heavy lifting.
Do I need to create separate GitHub repositories and/or branches to sync each Kubernetes environment?
The short answer is no. No, you don't have to do this. Because you already use Kustomize overlays in your project, you have full control over the deployment process to each environment. No need to create separate branches to target each environment, which is hard to maintain and not recommended.
For small projects it is often enough to use a monorepo structure where you have both application code and Kubernetes configuration manifests. In case of bigger projects, it's best to split application code and Kubernetes stuff into separate repositories. It's easier to track application vs Kubernetes changes this way.
This guides relies on a monorepo approach, but it should be relatively easy to migrate to a split repo setup because all Kubernetes manifests are kept in the kustomize subfolder.
Do I need a separate Argo CD instance per environment or just one connecting all?
You can go either one or the other. This guide is using a separate ArgoCD instance per environment. This kind of setup doesn't affect one environment or the other if one ArgoCD instance goes down, or even if one of the clusters is in a degraded state. Only the current environment where Argo operates is affected. This is called a decentralized setup. The only drawback of this configuration is that application specific resources and system specific resources operate in the same DOKS cluster which leads to additional CPU and/or memory usage.
Another kind of setup (not covered in this guide) is where you have one dedicated DOKS instance (or a dedicated node pool) to serve this purpose. This is called a centralized setup where one Argo CD instance manages all environments from a single place. Main advantage is user application is now decoupled from system apps, and more resources become available for the app you're developing. Main disadvantage is additional costs for operating a dedicated cluster. Another drawback is possible Argo CD downtime for all environments if HA is not properly configured, or if the cluster is not properly sized to handle multiple Argo projects and applications.
Following diagram depicts the Argo CD setup used in this guide for each environment (decentralized setup):
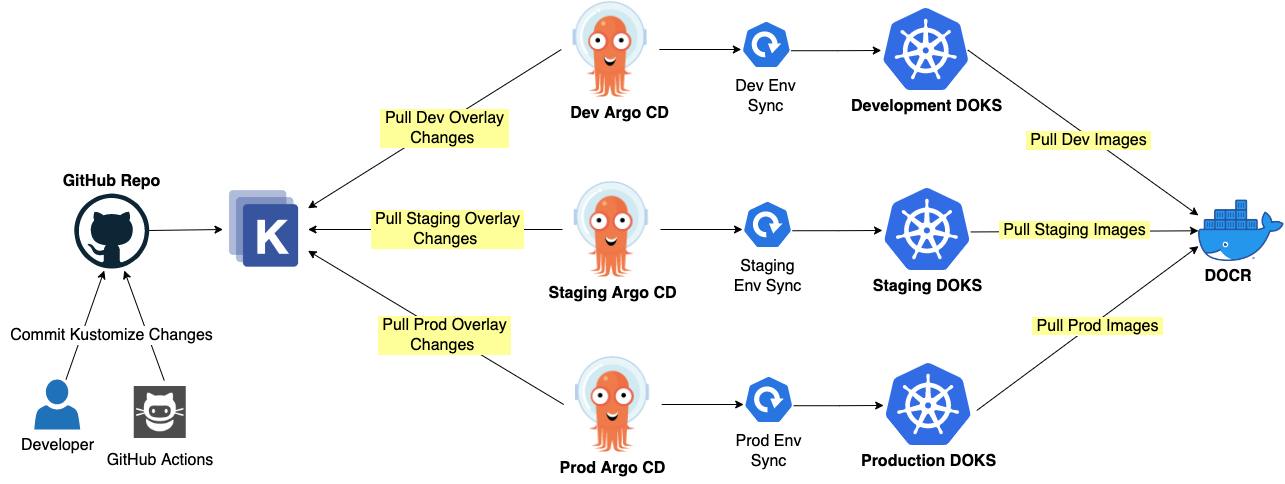
It's important to understand Argo CD concepts, so please follow the official getting started guide. To keep it short, you need to know how to operate Argo applications and projects. The application CRD is the most important bit of configuration dealing with connecting various sources such as Git repositories and Kubernetes clusters. On the other hand, Argo CD projects represent a logical way of grouping multiple applications related to each other.
This chapter relies on the Argo CD Autopilot project to bootstrap Argo itself, as well as example applications (i.e. microservices-demo).
Why use Argo CD autopilot?
Some people argue that the app of apps pattern solves all problems related to bootstrapping Argo apps and projects. This is true, but there are some missing pieces:
- Argo CD has to be installed first (this is a one time operation usually, so maybe not a big deal).
- You have to create initial manifest(s) for Argo to consume (including the manifest implementing the app of apps pattern).
- Create and layout your GitOps repository.
- Enforce a set of best practices for your GitOps repository.
- Commit and push required Argo manifests to your GitOps repository.
- Tell Argo about your intentions which requires
kubectl applyfor the involved manifests.
The Argo CD autopilot project tries to solve all enumerated steps above. It uses an opinionated way to bootstrap your GitOps environment, and embeds a set of best practices to layout your Argo apps and projects in a GitOps fashion. On top of that, Argo CD is bootstrapped as well on your target cluster with just only one command. When needed, the autopilot CLI can be used to repeat the bootstrap process if your cluster is re-created, without pushing all manifests again to your existing repo (a special flag exists, called --recover).
To summarize, here's what Argo CD autopilot can do for you:
- Creates a GitOps repository (if doesn't exists) using an opinionated approach for your Argo apps and projects.
- Bootstraps Argo CD on your DOKS cluster, and keeps itself in sync using same GitOps repo.
- Helps you create apps and projects which are then automatically synced by your Argo instance (no need to run
kubectl apply). - Enforces a set of best practices for all operations.
Next, you will learn how to bootstrap Argo CD for each environment using the autopilot CLI. The procedure is basically the same, so once you learn how to do it for one environment, it should be pretty straightforward to perform the same steps for the remaining ones.
Prerequisites
To complete this section you will need:
- A container registry already set up as explained in the Getting Started -> Set up DOCR section. Also, make sure the initial version (
v1.0.0) for the demo application is already pushed to your DOCR as explained in the same chapter. - A DOKS cluster set up and running for each environment:
- The
microservices-demoGitHub repository already prepared as explained in the Preparing demo application GitHub repository section. - Argo CD Autopilot CLI installed for your distribution as explained in the official docs.
- A GitHub Personal Access Token (or PAT for short) with the
repopermissions set. It is required only once by the autopilot CLI to bootstrap Argo CD to your cluster for each environment.
Bootstrapping Argo CD for the Development Environment
In this section you will deploy Argo CD to your development DOKS cluster using the autopilot CLI . Then, you will configure Argo to sync application changes using the dev overlay folder from your microservices-demo GitHub repository.
The Argo CD autopilot project aims to ease the initial bootstrapping process of your Argo instance for each environment. What is nice about this approach is that the Argo installation itself is also synced with your GitHub repo in a GitOps fashion. The autopilot CLI will first deploy Argo CD in your cluster, and then push all required manifests to your GitHub repository.
Bootstrap Instructions
Note
You may need to temporarily disable main branch protection to perform the following steps.
Please follow below steps to bootstrap Argo CD, and deploy the microservices-demo app to the development environment:
-
Export the
GIT_TOKENenvironment variable containing your GitHub personal access token (make sure to replace the<>placeholders first): -
Switch Kubernetes context to your
microservices-demo-devcluster (notice that cluster name is prefixed using thedo-<region>-identifier): -
Bootstrap Argo CD for the development DOKS cluster using the autopilot CLI. You need to do this only once on a fresh cluster (make sure to replace the
<>placeholders first):argocd-autopilot repo bootstrap \ --repo "https://github.com/<YOUR_GITHUB_USERNAME>/microservices-demo/argocd/dev"Note
- Once the process finishes successfully you will receive instructions how to access the Argo CD web interface. Most important, you will get the admin user password - put it safe for later use.
- Also, a new folder should be present in your Git repository -
argocd/dev, containing all manifests for theArgo CD devenvironment instance. The same folder is synced by Argo to keep itself up to date, thus following GitOps principles.
-
Check if the
Argo CD devinstance is up and running:The output looks similar to:
NAME                               READY   UP-TO-DATE   AVAILABLE   AGE
argocd-applicationset-controller   1/1     1            1           15m
argocd-dex-server                  1/1     1            1           15m
argocd-notifications-controller    1/1     1            1           15m
argocd-redis                       1/1     1            1           15m
argocd-repo-server                 1/1     1            1           15m
argocd-server                      1/1     1            1           15m
All Argo CD deployments must be healthy and running.
-
Create an Argo project for the
devenvironment (make sure to replace the<>placeholders first):argocd-autopilot project create dev \ --repo "https://github.com/<YOUR_GITHUB_USERNAME>/microservices-demo/argocd/dev"Tip
It's best practice to organize your Argo applications using projects. For example, you can use Argo projects to define environments, such as in the above example.
-
Finally, create an Argo application for the
microservices-demoproject using the Kustomizedevoverlay (make sure to replace the<>placeholders first):argocd-autopilot app create microservices-demo \ --app "https://github.com/<YOUR_GITHUB_USERNAME>/microservices-demo/kustomize/dev" \ --repo "https://github.com/<YOUR_GITHUB_USERNAME>/microservices-demo/argocd/dev" \ --project dev \ --type kustomizeExplanations for the above command:
--app- the application specifier. Here, autopilot CLI expects the repository URL and path to sync in the following format -https://github.com/<GITHUB_USERNAME>/<REPO_NAME>/<APP_PATH>. Above example uses thekustomize/devoverlay path for themicroservices-demorepo because that's what renders the final application manifests for the specific environment.--repo- the repository URL and path where autopilot CLI commits the Argo manifests representing applications, projects, etc. Here, the same repository URL is being used, except the directory path -argocd/dev. In a separate note down below, you will find the main reason why this approach is used.--project- Argo project name to use for the new application (created in the previous step). The given project name reflects the environment name -dev. This may seem confusing at the beginning because you already defined adevenv in thekustomize/devpath from the root directory of your microservices-demo repo. It seems natural to use environment names to define Argo CD projects, but in the end you can pick any name that fits best to describe your project.-
--type- tells ArgoCD the application type (kustomize or directory). The autopilot CLI is able to infer the application type by looking at the specified repo path, but most of the time it's better to be explicit rather than implicit (or let the tool guess).Note
Each environment is nested using the
argocdfolder from the root directory of yourmicroservices-demoproject. This guide is using a monorepo approach to sync all environments, hence the reason. By default, autopilot CLI puts everything in the root directory of your GitHub repo resulting in a mess if no path is specified.
Now, check if Argo created the microservices-demo application. First, port-forward the Argo web interface:
Open the Argo CD dashboard in your web browser using this link - localhost:8080:
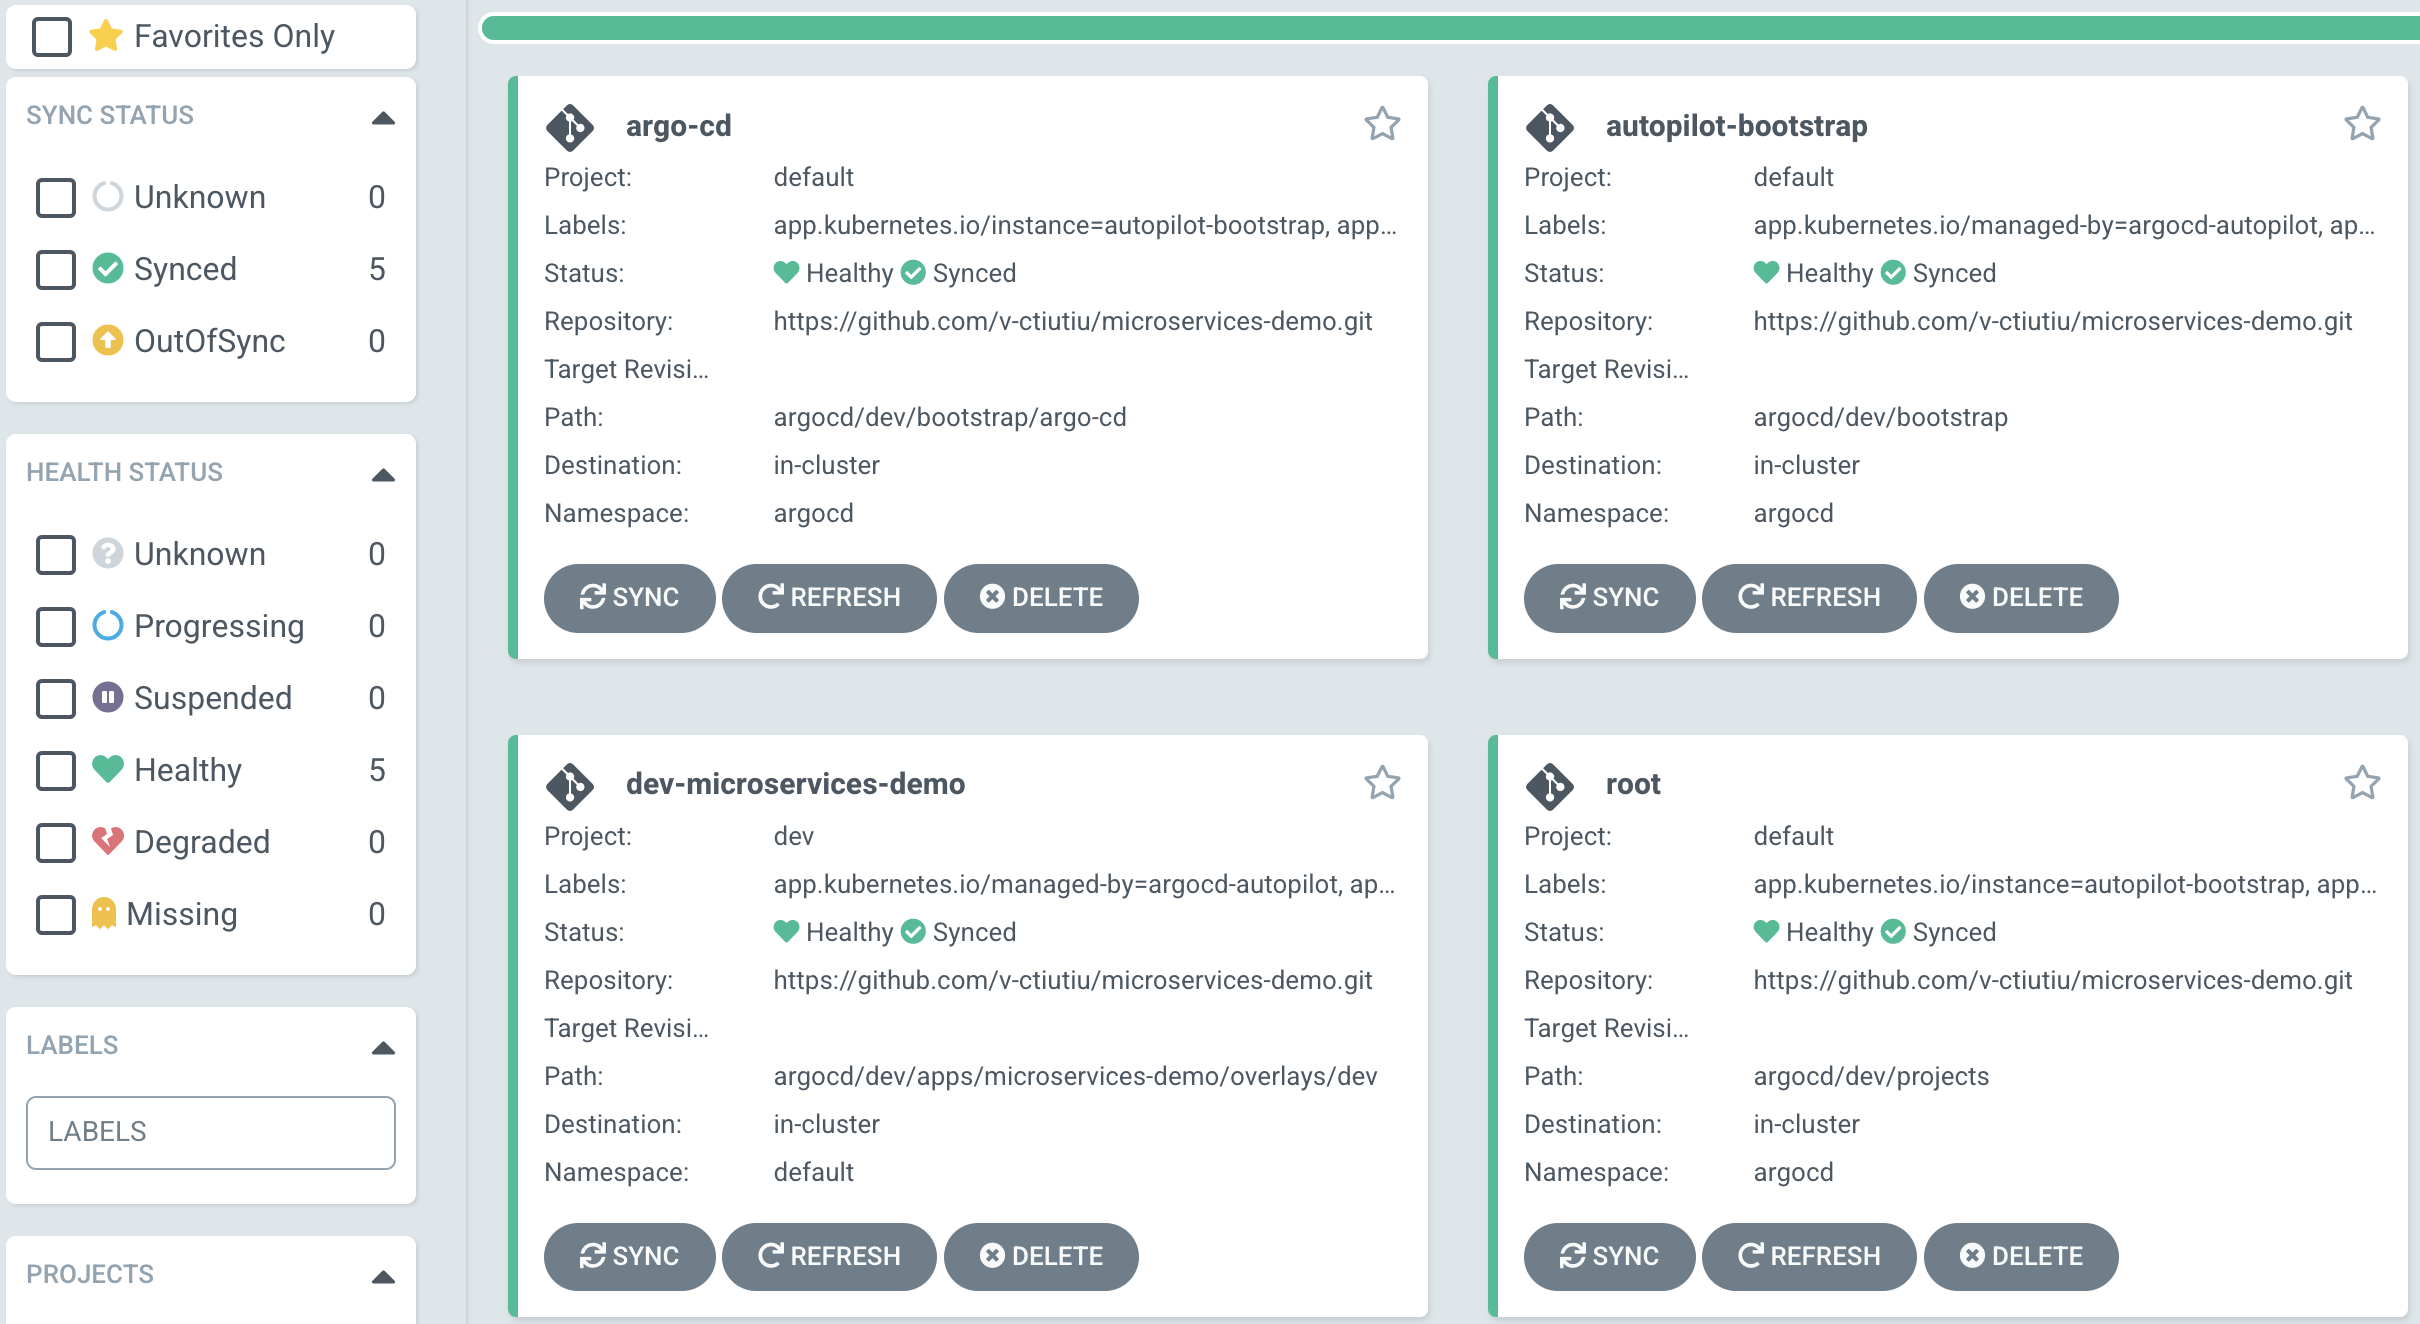
If everything went well, you should see the dev-microservices-demo app created and synced successfully.
Note
- Argo CD is using this naming convention -
<project_name>-<app_name>, hence thedev-microservices-demoname for the application. - Please bear in mind that Argo CD is using the Git polling method by default which takes around 3 minutes to trigger, hence changes are not propagated instantly.
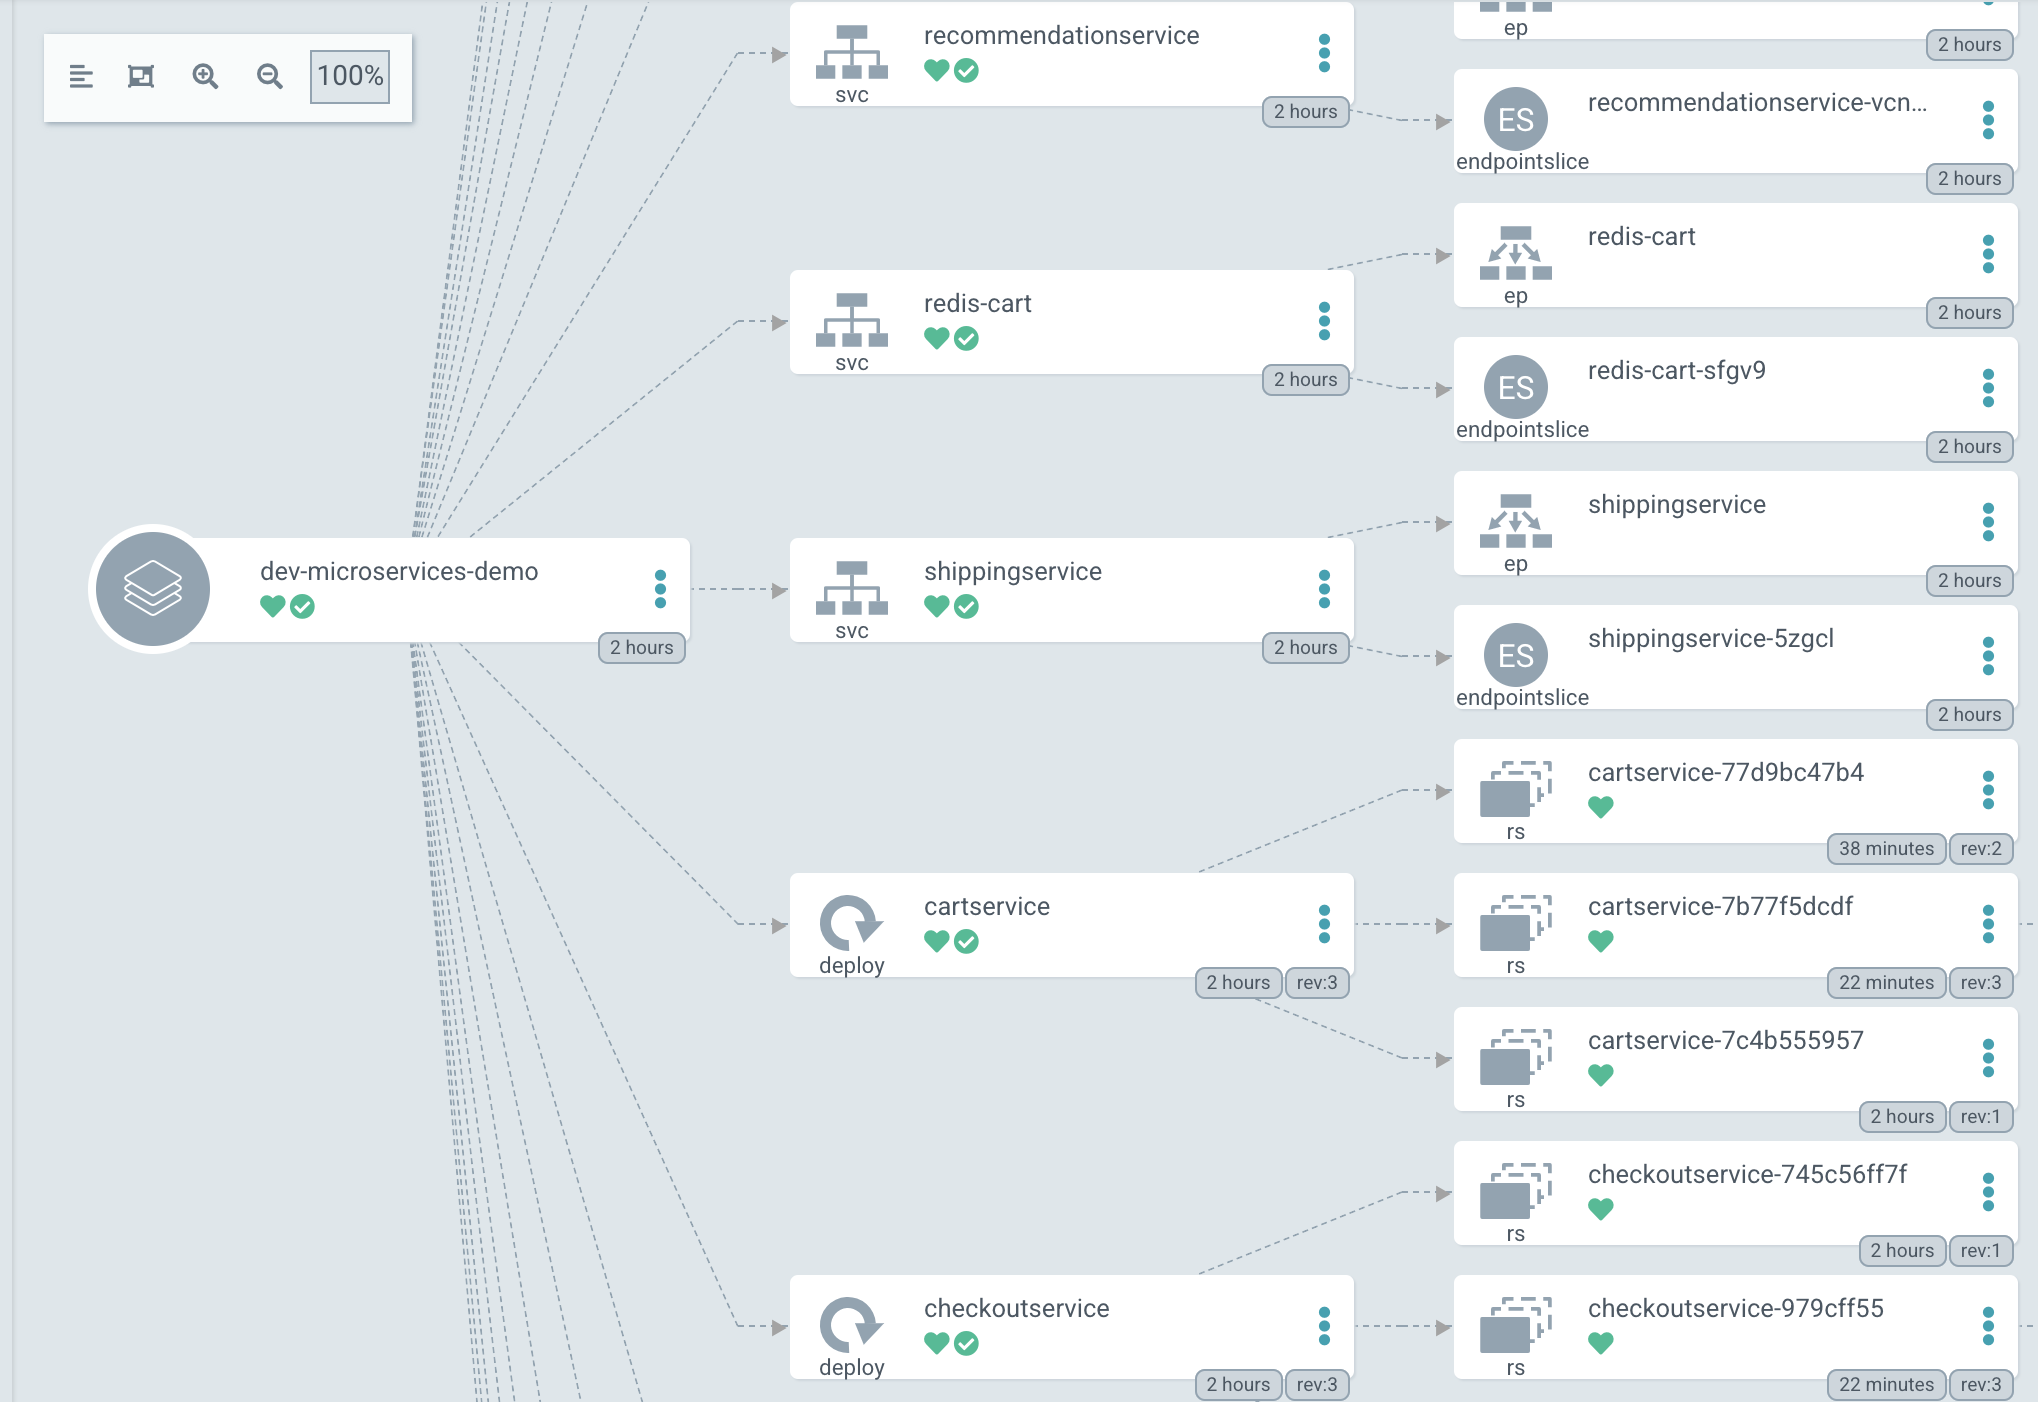
Next, click on the dev-microservices-demo app tile - you should see the online boutique application composition (microservices):
Finally, port-forward the frontend service to check the online boutique application status:
Open a web browser pointing to localhost:9090 - you should see the online boutique application landing page.
Tip
You should see the previous changes that you made in the Set up continuous integration -> Testing the Online Boutique Application GitHub Workflows chapter applied as well.
Understanding GitOps Repository Layout
The Argo CD autopilot project is using an opinionated approach to structure your GitOps repository. It does this by creating dedicated folders to store your Argo applications, projects, etc. Following directory structure is created for you automatically in the argocd/dev subfolder (this is the base folder used by Argo to sync your development environment):
argocd/dev/
├── apps
│   ├── README.md
│   └── microservices-demo
│       ├── base
│       │   └── kustomization.yaml
│       └── overlays
│           └── dev
│               ├── config.json
│               └── kustomization.yaml
├── bootstrap
│   ├── argo-cd
│   │   └── kustomization.yaml
│   ├── argo-cd.yaml
│   ├── cluster-resources
│   │   ├── in-cluster
│   │   │   ├── README.md
│   │   │   └── argocd-ns.yaml
│   │   └── in-cluster.json
│   ├── cluster-resources.yaml
│   └── root.yaml
└── projects
    ├── README.md
    └── dev.yaml
Explanations for the above structure:
apps- this is the main subfolder where you store all your Argo applications such as themicroservice-demoproject used in this guide. Each application you create in this subfolder is automatically synced by Argo to your target cluster. You'll also find aREADMEfile in this folder with additional explanations (automatically generated by the autopilot CLI).bootstrap- this is where Argo stores all manifests used to bootstrap itself. Usually you don't need to touch this folder unless upgrading Argo to a newer version.projects- this is the main subfolder where you store all your Argo projects. Projects are a way to logically group related Argo applications stored in theappsfolder. You'll also find aREADMEfile in this folder with additional explanations (automatically generated by the autopilot CLI).
How does Argo know how to sync your microservices-demo app for the dev environment?
Argo is watching over the argocd/dev path from your repo for changes. The microservices-demo app is stored under the same directory. If you take a look at the argocd/dev/apps/microservices-demo/base/kustomization.yaml manifest, you will see that it points to the kustomize/dev path from the main repo:
apiVersion: kustomize.config.k8s.io/v1beta1
kind: Kustomization
resources:
    - https://github.com/<YOUR_GITHUB_USERNAME>/microservices-demo/kustomize/dev
So, whenever you commit something in the kustomize/dev path, Argo will automatically pick up the changes, and sync the microservices-demo application for your dev environment.
Managing Argo CD Applications
Argo CD autopilot can be used for adding (or bootstrapping) new applications whenever needed. However, when you need to change or upgrade existing apps it is advised to use Git operations to perform changes (via pull requests). In other words, use GitOps practices.
Next, you will perform the same steps to bootstrap Argo CD for the staging environment.
Bootstrapping Argo CD for the Staging Environment
In this section you will deploy Argo CD to your staging DOKS cluster using the autopilot CLI . Then, you will configure Argo to sync application changes using the staging overlay folder from your microservices-demo GitHub repository.
Note
You may need to temporarily disable main branch protection to perform the following steps.
Please follow below steps to bootstrap Argo CD, and deploy the microservices-demo app to the staging environment:
-
Export the
GIT_TOKENenvironment variable containing your GitHub personal access token, if not already (make sure to replace the<>placeholders first): -
Switch Kubernetes context to your
microservices-demo-stagingcluster (notice that cluster name is prefixed using thedo-<region>-identifier): -
Bootstrap Argo CD for the staging DOKS cluster using the autopilot CLI. You need to do this only once on a fresh cluster (make sure to replace the
<>placeholders first):argocd-autopilot repo bootstrap \ --repo "https://github.com/<YOUR_GITHUB_USERNAME>/microservices-demo/argocd/staging"Note
- Once the process finishes successfully you will receive instructions how to access the Argo CD web interface. Most important, you will get the admin user password - put it safe for later use.
- Also, a new folder should be present in your Git repository -
argocd/staging, containing all manifests for theArgo CD stagingenvironment instance. The same folder is synced by Argo to keep itself up to date, thus following GitOps principles.
-
Check if the
Argo CD staginginstance is up and running:The output looks similar to:
NAME                               READY   UP-TO-DATE   AVAILABLE   AGE
argocd-applicationset-controller   1/1     1            1           10m
argocd-dex-server                  1/1     1            1           10m
argocd-notifications-controller    1/1     1            1           10m
argocd-redis                       1/1     1            1           10m
argocd-repo-server                 1/1     1            1           10m
argocd-server                      1/1     1            1           10m
All Argo CD deployments must be healthy and running.
-
Create an Argo project for the
stagingenvironment (make sure to replace the<>placeholders first):argocd-autopilot project create staging \ --repo "https://github.com/<YOUR_GITHUB_USERNAME>/microservices-demo/argocd/staging"Tip
It's best practice to organize your Argo applications using projects. For example, you can use Argo projects to define environments, such as in the above example.
-
Finally, create an Argo application for the
microservices-demoproject using the Kustomizestagingoverlay (make sure to replace the<>placeholders first):
To verify the whole setup works, please use the same procedure as you already learned in the Bootstrapping Argo CD for the Development Environment section of this chapter.
Note
Please bear in mind that Argo CD is using the Git polling method by default which takes around 3 minutes to trigger, hence changes are not propagated instantly.
The provisioned GitOps repository layout structure is similar to the dev environment, the only difference being the name. Of course, you will have environment specific details stored as well. Managing Argo CD applications goes the same way.
Next, you will perform the same steps to bootstrap Argo CD for the production environment.
Bootstrapping Argo CD for the Production Environment
In this section you will deploy Argo CD to your production DOKS cluster using the autopilot CLI . Then, you will configure Argo to sync application changes using the prod overlay folder from your microservices-demo GitHub repository.
Note
You may need to temporarily disable main branch protection to perform the following steps.
Please follow below steps to bootstrap Argo CD, and deploy the microservices-demo app to the production environment:
-
Export the
GIT_TOKENenvironment variable containing your GitHub personal access token, if not already (make sure to replace the<>placeholders first): -
Switch Kubernetes context to your
microservices-demo-productioncluster (notice that cluster name is prefixed using thedo-<region>-identifier): -
Bootstrap Argo CD for the production DOKS cluster using the autopilot CLI. You need to do this only once on a fresh cluster (make sure to replace the
<>placeholders first):argocd-autopilot repo bootstrap \ --repo "https://github.com/<YOUR_GITHUB_USERNAME>/microservices-demo/argocd/prod"Note
- Once the process finishes successfully you will receive instructions how to access the Argo CD web interface. Most important, you will get the admin user password - put it safe for later use.
- Also, a new folder should be present in your Git repository -
argocd/prod, containing all manifests for theArgo CD productionenvironment instance. The same folder is synced by Argo to keep itself up to date, thus following GitOps principles.
-
Check if the
Argo CD productioninstance is up and running:The output looks similar to:
NAME                               READY   UP-TO-DATE   AVAILABLE   AGE
argocd-applicationset-controller   1/1     1            1           5m
argocd-dex-server                  1/1     1            1           5m
argocd-notifications-controller    1/1     1            1           5m
argocd-redis                       1/1     1            1           5m
argocd-repo-server                 1/1     1            1           5m
argocd-server                      1/1     1            1           5m
All Argo CD deployments must be healthy and running.
-
Create an Argo project for the
productionenvironment (make sure to replace the<>placeholders first):argocd-autopilot project create prod \ --repo "https://github.com/<YOUR_GITHUB_USERNAME>/microservices-demo/argocd/prod"Tip
It's best practice to organize your Argo applications using projects. For example, you can use Argo projects to define environments, such as in the above example.
-
Finally, create an Argo application for the
microservices-demoproject using the Kustomizeprodoverlay (make sure to replace the<>placeholders first):
To verify the whole setup works, please use the same procedure as you already learned in the Bootstrapping Argo CD for the Development Environment section of this chapter.
Note
Please bear in mind that Argo CD is using the Git polling method by default which takes around 3 minutes to trigger, hence changes are not propagated instantly.
The provisioned GitOps repository layout structure is similar to the dev or staging environment, the only difference being the name. Of course, you will have environment specific details stored as well. Managing Argo CD applications goes the same way.
Testing the Final Setup
As an exercise, go ahead and make a change to one or even more microservices. Then, open a PR and check the associated workflow. Next, approve the PR and merge change into main branch. Check the main branch GitHub workflow as it progresses. When finished, check if Argo propagated the latest changes to your development DOKS cluster.
Reverting Bad Application Deployments
Up to this point you tested only the happy CI/CD flows for the main application. In reality things may go wrong, hence it's important to know how to deal with this kind of situations as well. Because you're already using GitOps it should be easy to revert changes in case something goes bad. The only place where you need to perform changes is the GitHub repository hosting your application.
Moving forward, everything is controlled via pull requests because you already set main branch protection rules. So, the process doesn't get out of control because no one pushes inadvertently to the main branch - this is very important to avoid configuration drifts, and bad things to happen.
Still, even with all processes you already have in place, there's is a chance for human errors to slip. Thus, it is very important to know how to handle and recover from this situation. There are two options available:
- Use the GitHub PR revert feature. It is a feature present in the GitHub user interface which creates a new PR that contains one revert of the merge commit from the original merged pull request. After merging the PR into main branch, Argo CD will pickup changes and deploy the previous images for the application. This approach has a few pros and cons:
- It is easier to revert back to the original state via single button in the GitHub user interface. It feels natural, just as you would do using the
Undofeature from your IDE, or any other desktop application. This aspect falls into the pros category. - It will trigger the whole set of CI workflows again. First, the PR workflow, and then the main branch workflow which rebuilds the same set of images basically but using a different commit ID. In the end, you will achieve the final goal and revert things back to their initial state, but the outcome is unnecessary images being built and additional waiting time (things may break in between also). This aspect falls more into the cons category.
- You have more control over the process, meaning you also revert the whole batch of changes for application code which may be a desired thing or not. This aspect falls more or less into the pros category.
- It is easier to revert back to the original state via single button in the GitHub user interface. It feels natural, just as you would do using the
- Another option is to create a fresh PR, and revert only the
kustomizechanges to switch to the previous deployment that worked. This approach is morelightweightand doesn't trigger a bunch of GitHub workflows as in the first approach. On the other hand, defective application code stays in place. But, the main advantage is that you revert your application to a working state very quickly, thus it creates minimum application downtime.
If choosing the second option, you have time to prepare a set of fixes (or hot-fixes) meanwhile. When everything is ready and you feel confident about your work, go as usual with the CI flow. Open a new PR with your code changes, obtain approval, merge into main branch, Argo CD picks up and updates the application in the development cluster.
The first approach is already set up, so if you need to go that route there's nothing new to learn or implement. Following example is based on the second approach.
Steps to revert a bad deployment for the development environment (applies to upper environments as well):
-
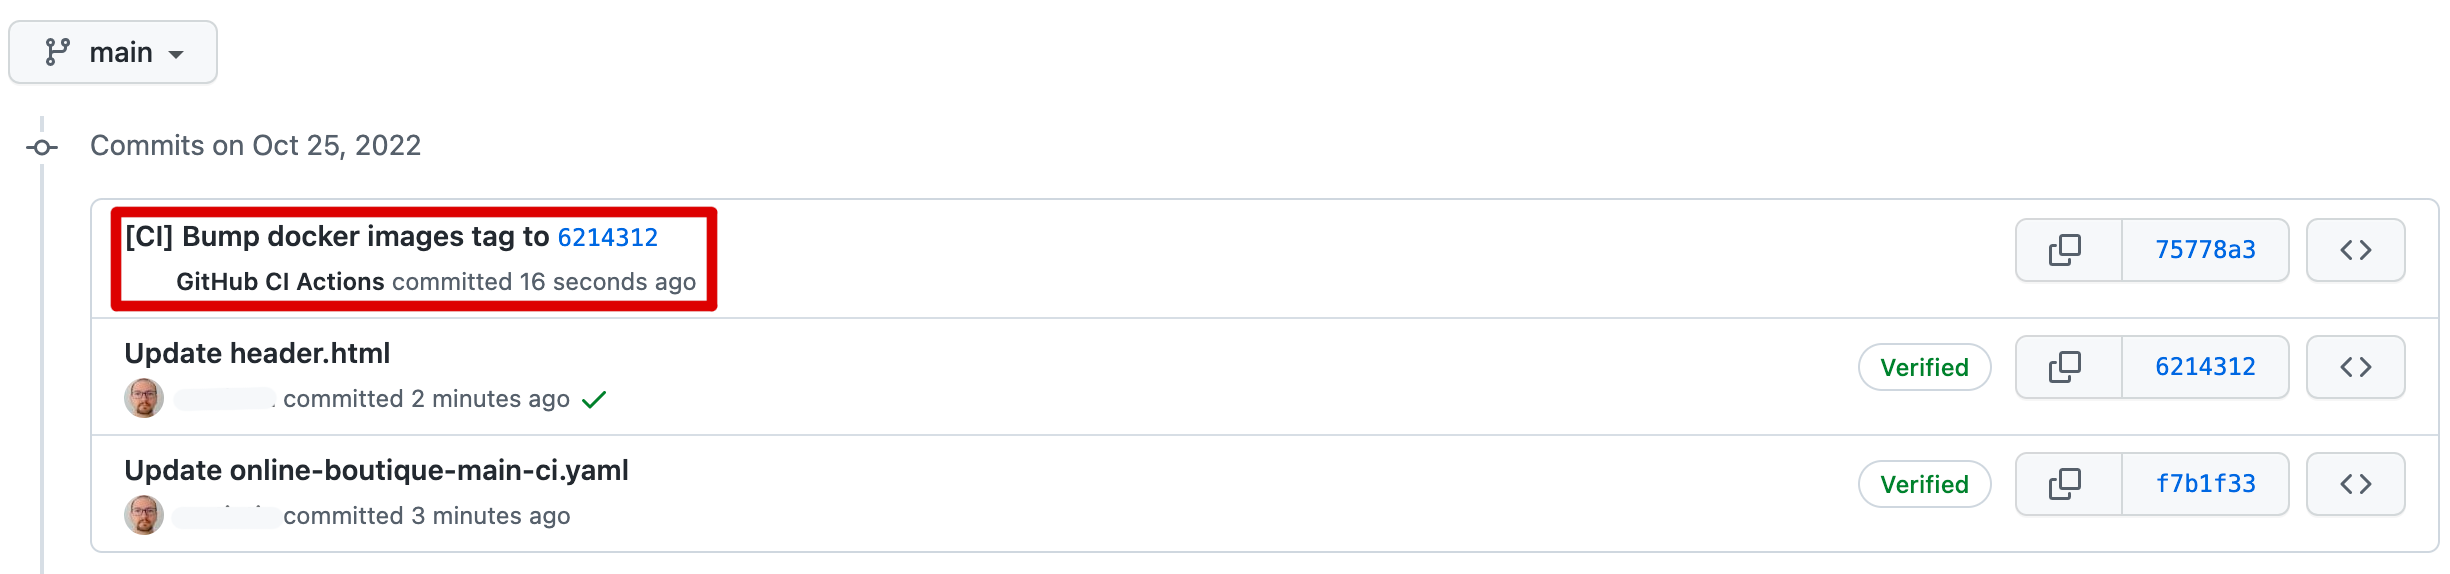
Identify the problematic commit ID in your application GitHub repository. You should be able to spot it quickly because it contains the following signature:
-
Navigate to the respective commit ID, and see what changed:
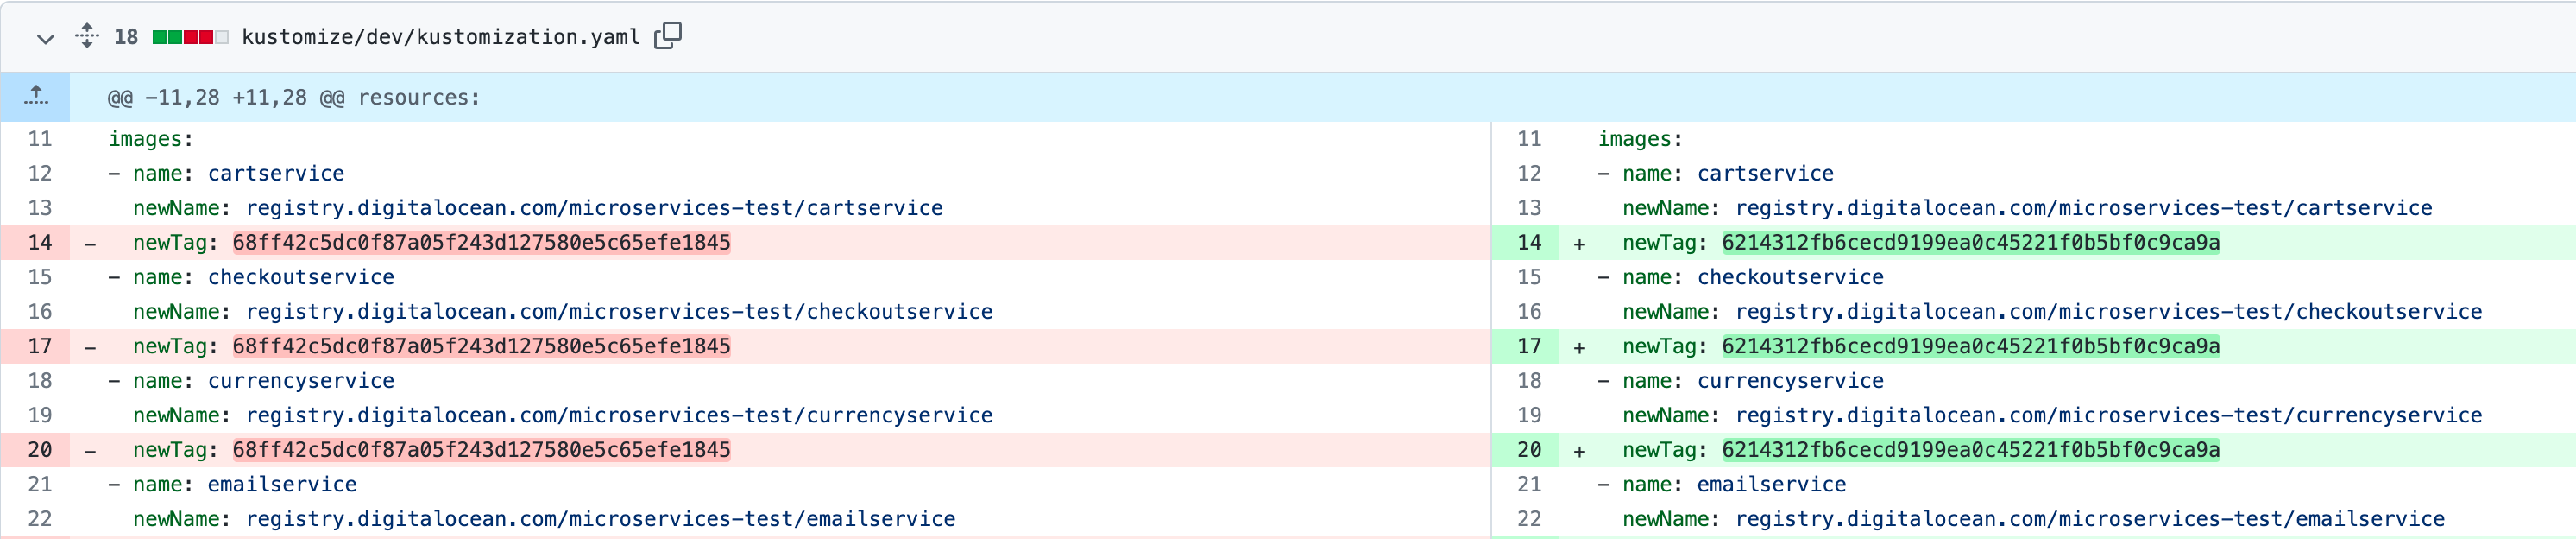
-
Create a new PR containing changes with the previous image tag for each affected microservice (the value highlighted using red color in the Git diff shown in the above image).
- Wait for the Kustomize manifests validation workflow to finish, and if everything is alright approve and merge the PR.
After a few moments (3 minutes max), you should see the old version of the microservices-demo application present in your development environment.
Restoring a Lost Argo CD Instance
If for some reason the DOKS cluster is re-created and the associaged Argo CD instance is lost, then you should be able to recover from this situation using your existing GitOps repository (assuming it is still intact). It's a feature offered by the Argo CD autopilot CLI via a special flag called --recover.
Note
Don't forget to integrate your new DOKS cluster with DOCR before anything else. If you forget to perform this step, all Kubernetes deployments will fail to pull application images from your registry.
Assuming you want to recover the staging environment Argo CD instance, please follow below steps:
-
Export the
GIT_TOKENenvironment variable containing your GitHub personal access token, if not already (make sure to replace the<>placeholders first): -
Switch Kubernetes context to your
stagingcluster. Below example is usingdo-nyc1-microservices-demo-stagingfor demonstration - make sure to change value if yours is different: -
Run the autopilot bootstrap using the
--recoverflag this time (make sure to replace the<>placeholders first):
What the above command does is it will clone your GitOps repository first as specified by the --repo flag. Then, it will install a fresh Argo CD instance using environment specific manifests pointed by the last part of the repository path, i.e. argocd/staging. Environment specific applications and projects should be restored as well. GitOps repository Kustomize manifests should remain untouched.
So far, you learned how to configure and enable an automated CI/CD flow for the development environment. Next, you will learn how to create GitHub releases for your application and propagate (or promote) changes to upper environments as well. First to the staging environment, and then after QA approval (may imply project manager decision as well), deploy to production.